
Grayscale Matrix
Achieve Light and Dark Engravings Using Laser Parameters
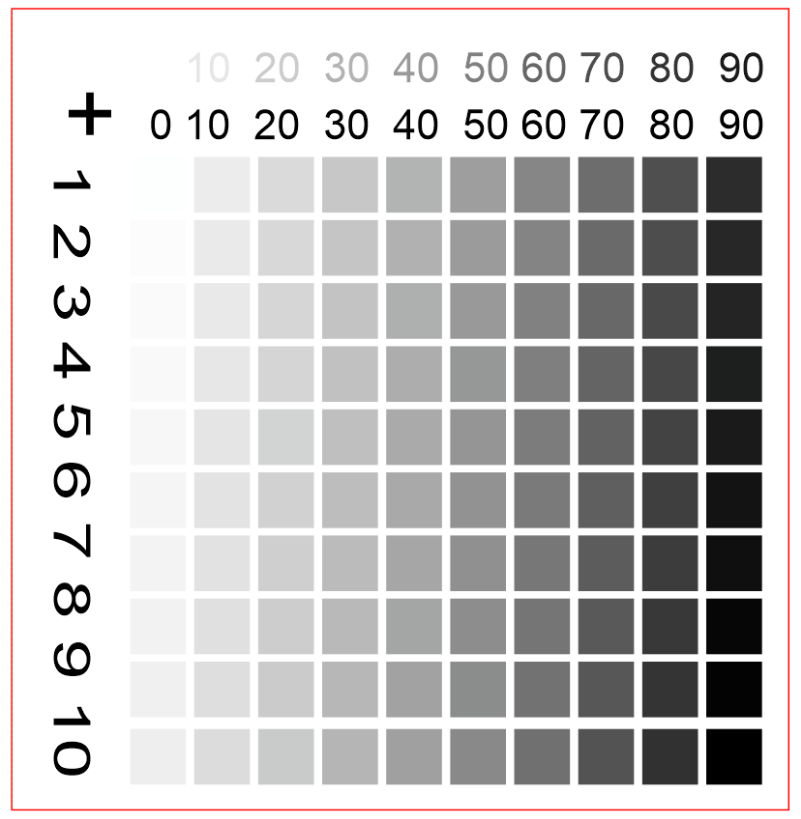
You can achieve different colour shades on your workpiece with the assistance of a grayscale matrix.

Determining Your Laser Parameters Using the Grayscale Matrix
The test matrix consists of 100 different shades of gray. Using the Relief function in Ruby® or in the JobControl® printer driver, the appropriate parameters can easily be determined.
The example below illustrates how to achieve a particular shade on the grid:
Assume you wish to achieve the shade corresponding to the box located in the fourth column and second row on the grid. The horizontal how indicates that 30% of the laser's maximum power level is required. However, you must also add the figure on the corresponding vertical axis (i.e., 2%). Therefore, the appropriate power level is 32%. Ensure that the speed level is identical to the one used to create the matrix. Otherwise, you may not achieve the desired results.
In addition, you can add your favourite settings to the parameter database in JobControl® to easily use them for future workpiece engraving.

Creating Your Own Grayscale Matrix
Ruby® : Add the grayscale matrix file into the prepare screen. Select or create a material with relief function. JobControl® : Begin by pasting the grayscale matrix template into your graphics program. Next, send the file to JobControl®, and set the "Process Mode" to "Relief" in the print settings.
Select the resolution in accordance to the material on which you would like to engrave the matrix. In the case of wood, select a DPI value between 333 and 500.
TIPS: If your laser system's wattage is 100W or greater, set the speed level to 100% and set the maximum power level to 80% (i.e., the grayscale matrix will have seven columns, with the maximum power level being 80%). If your laser system's wattage is 40W or higher, but less than 100W, set the speed level to 100% and the maximum power level to 100% If your laser system's wattage is lower than 40W, set the speed level to between 50% and 80% and the maximum power level to 100%

Understanding the Grayscale Matrix
Select the desired engraving shade from your grayscale matrix, and add the values from the corresponding vertical and horizontal axes. In the example pictured to the left, the appropriate power level would be 87%, which was obtained by adding the 80% value on the horizontal axis and the 7% value on the vertical axis.
You may save these settings to your material database for easy retrieval.

Engraving a Grayscale Matrix on Wood
A wooden test matrix contains both shades and tints of brown. At low-medium power levels, an engraving is white.
TIP: To achieve darker engraving results on wooden surfaces, set the Z-offset in the positive range and repeat the test process.
Technical Support
Contact our team of technical support specialists for assistance with laser setting configuration.

